Introduction to Symbol Configuration in CODESYS
Symbol Configuration in CODESYS is essential for exposing your PLC variables to external applications and remote systems. While working with a virtual PLC environment (CODESYS Control Win v3), you can develop and test complete communication architectures without any physical hardware. This guide walks you through the entire process—from declaring global variables to monitoring real-time data exchange using UaExpert, a powerful OPC-UA client tool.
Whether you’re learning CODESYS, prototyping communication protocols, or validating a system design, this step-by-step approach will help you master symbol configuration and OPC-UA integration.
Check out Codesys environment here: https://www.codesys.com/
Step 1: Create and Declare Global Variables in CODESYS
Start by creating a Global Variable List to hold all variables that will be communicated externally.
Note: For any application that communicates with external systems, a GVL is the industry standard approach.
In CODESYS IDE:
- Right-click on Application in the project tree
- Select Add Object > Global Variables List
- Name it GVL or similar
- Declare your communication variables:
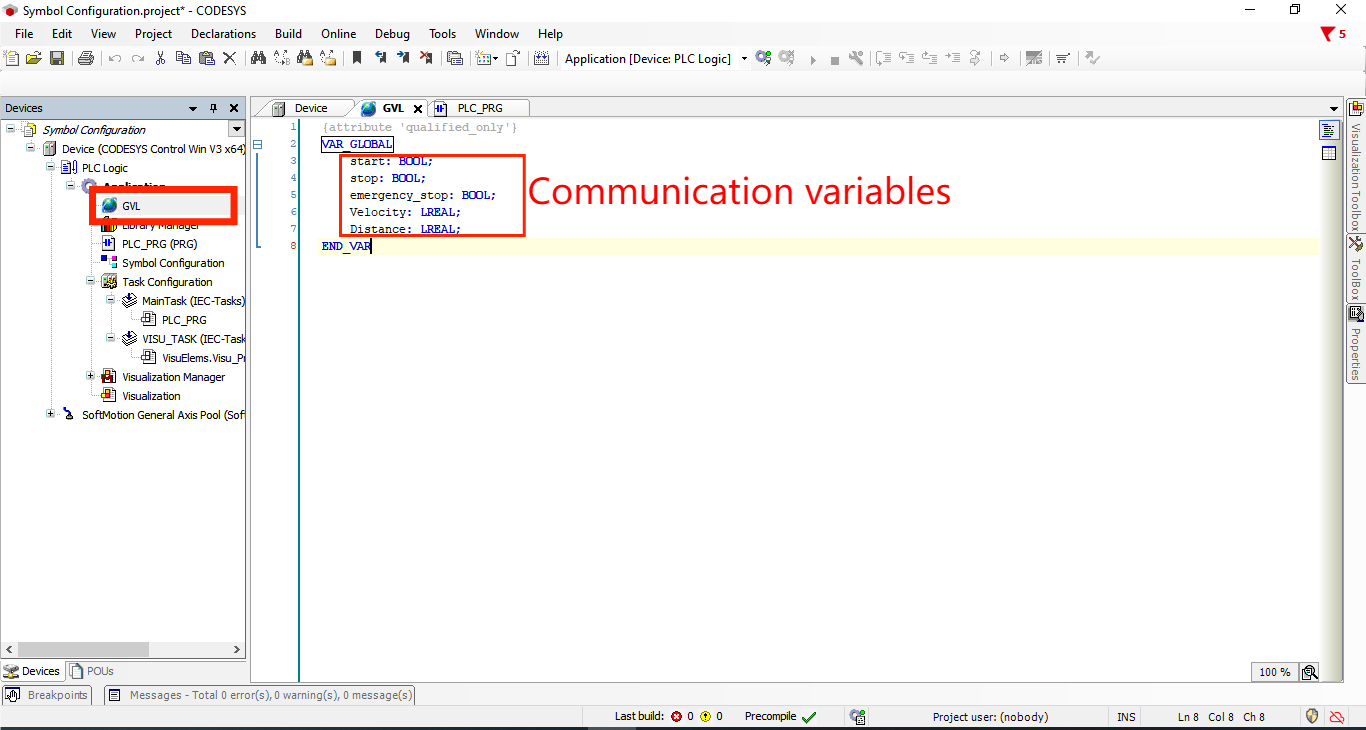
pile your project to ensure variables are properly declared. This creates the foundation for your symbol configuration.
Step 2: Start the Virtual CODESYS PLC Runtime
Before configuring anything in CODESYS IDE, you need to launch the virtual PLC runtime that will host your application.
Steps:
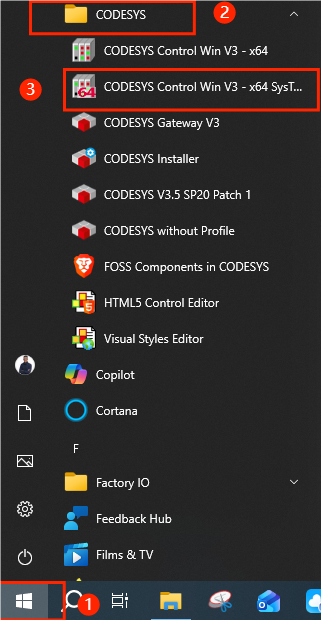
- Click the Start button on your Windows desktop
- Navigate to the CODESYS folder
- Inside, find CODESYS Control Win V3 – x64 SysTraY, click to launch it
- A window appears, write click
- Click Start PLC
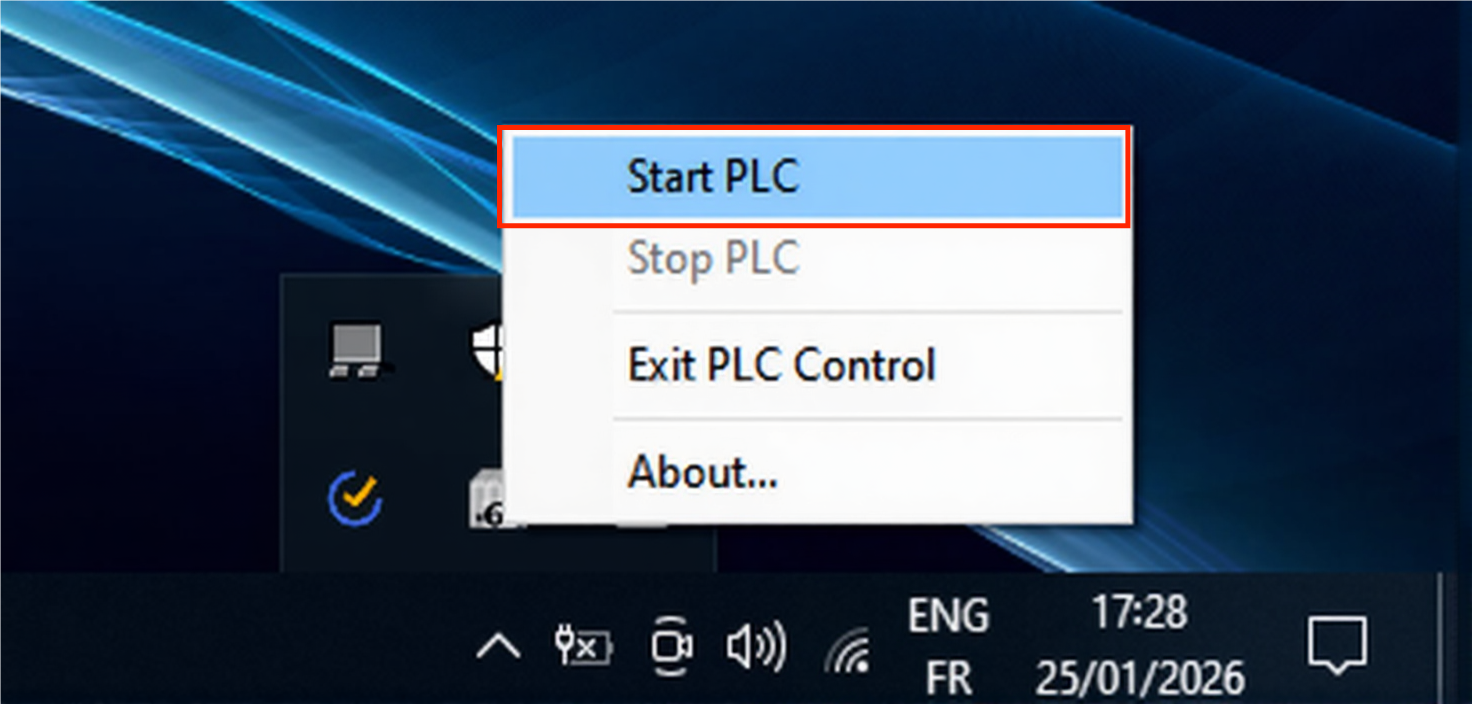
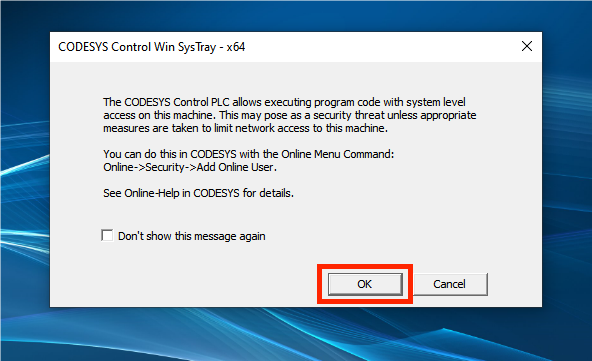
- A confirmation dialog appears stating the PLC has started
- Click OK
The virtual runtime is now active and listening for connections. You should see a system tray icon indicating the PLC is running.
Step 3: Scan Network and Connect to Virtual PLC
Now connect your CODESYS IDE to the running virtual PLC.
Steps:
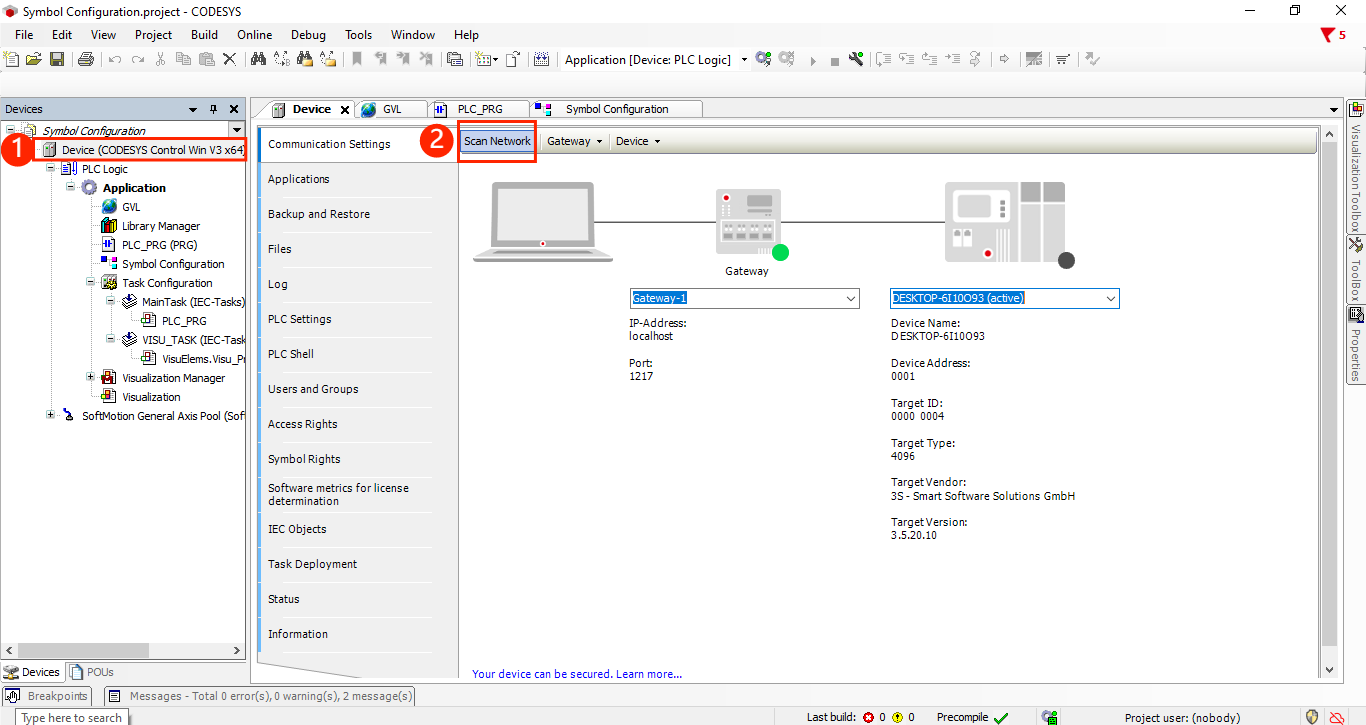
- In CODESYS IDE, open Device window and click on Scan network
- A dialog opens showing available devices
Important: Ensure your virtual PLC is running.
- Uncheck “Hide non-matching devices, filter by Target ID” to see all available devices
- Under Gateway-1, you should see your PC or machine name. Select it
- Click OK
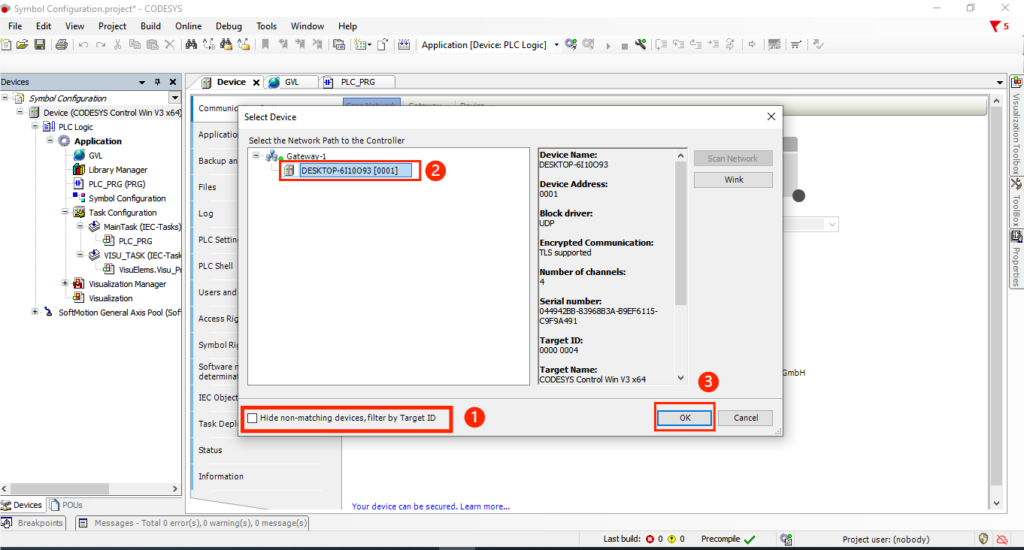
The system performs a network scan and discovers your CODESYS Control Win v3 instance.
Next: Log in to the device
- A login dialog appears
- Enter your username and your password
- Click OK
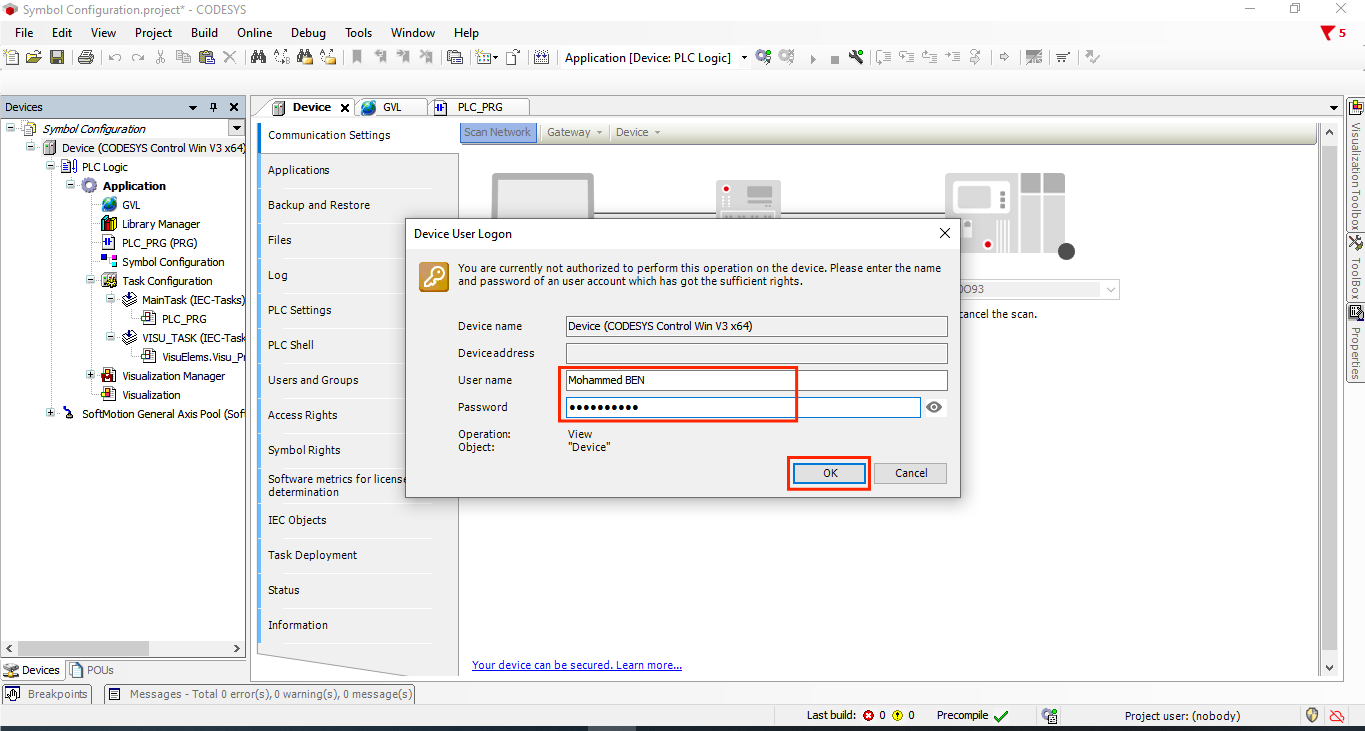
You’re now connected to the virtual PLC. The connection status should show “Online” in CODESYS IDE.
Step 4: PLC Connection Established
Once successfully logged in, your CODESYS IDE is now communicating with the virtual PLC runtime. You should see:
- Connection indicator showing active status
- Ability to download and run code on the virtual PLC
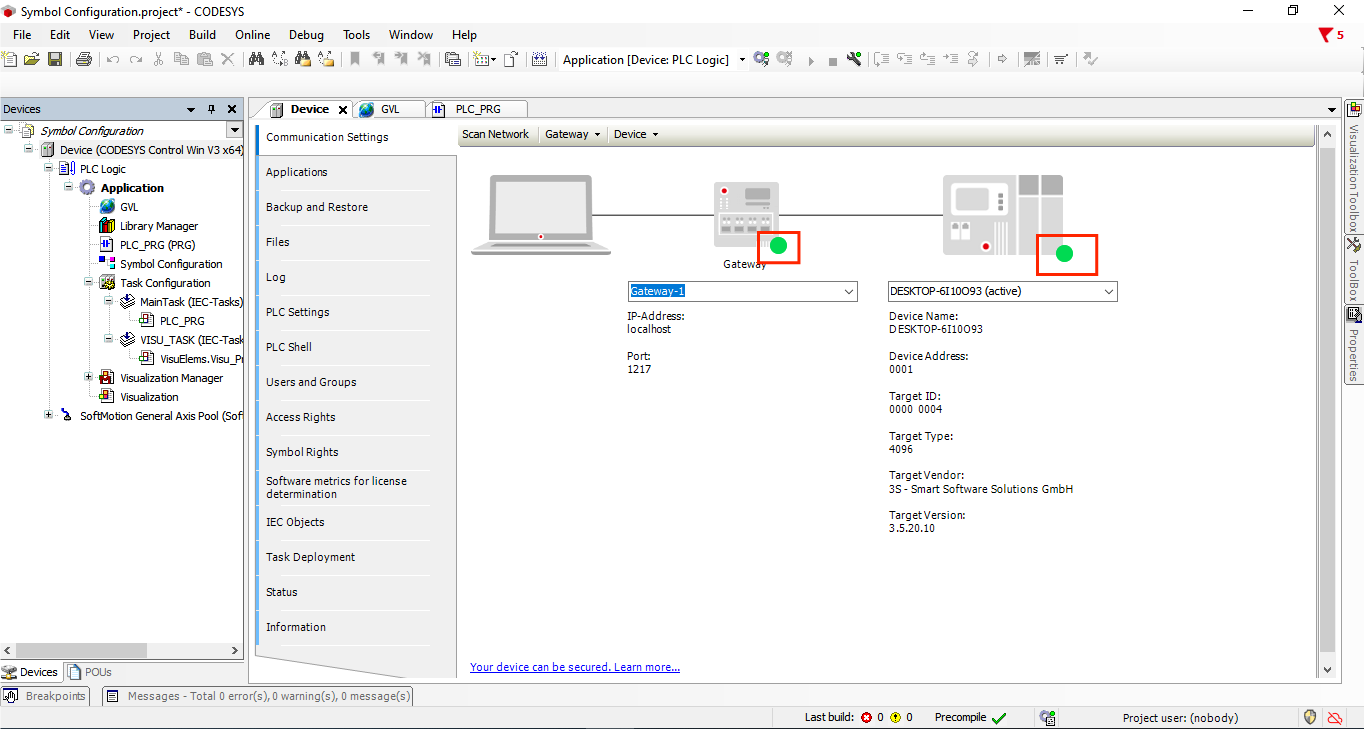
This connection remains active as you proceed with symbol configuration.
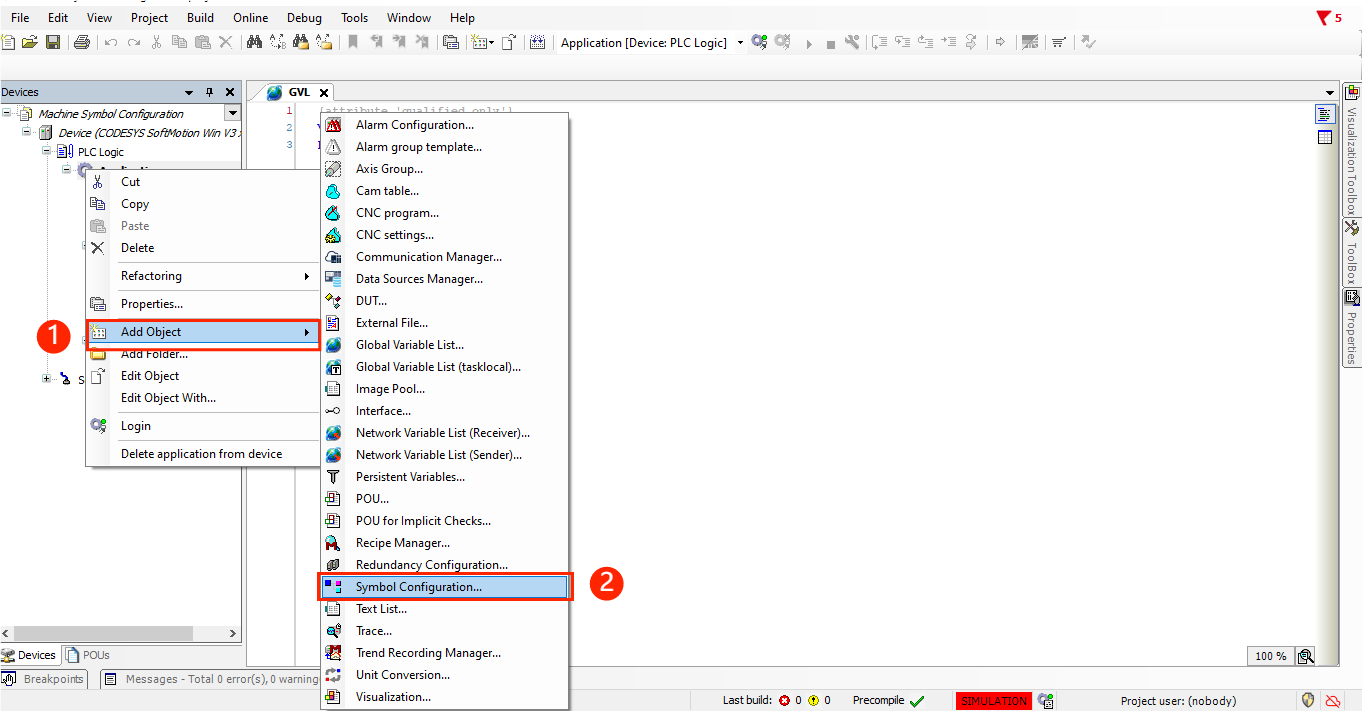
Step 5: Add Object: Symbol Configuration in CODESYS
Now create a symbol configuration that exposes your variables for external access.
Steps:
- Right-click on Application in the project tree
- Select Add Object
- Choose Symbol Configuration
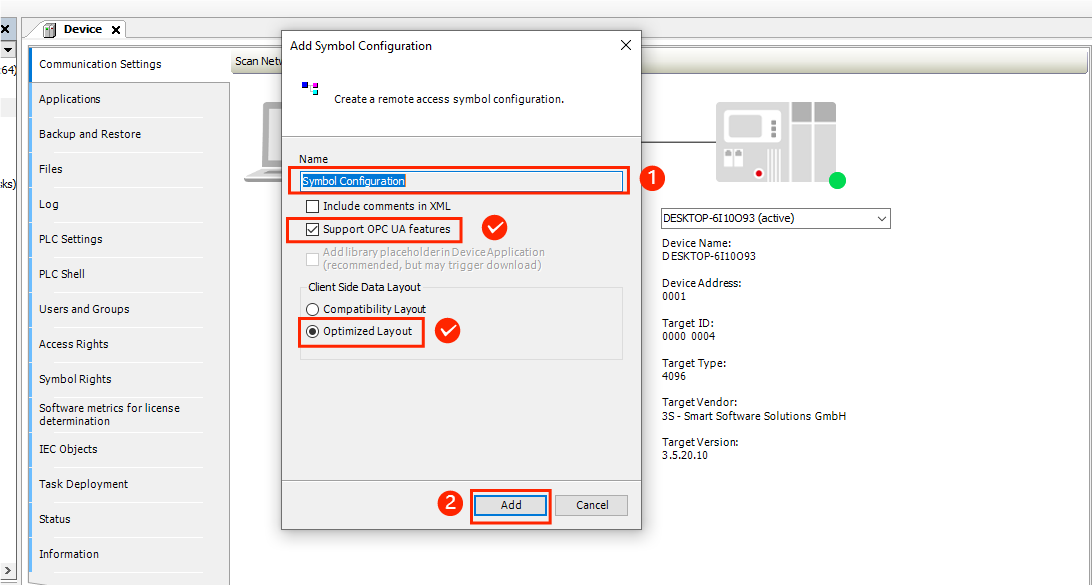
4. A new symbol configuration object is created
This creates the infrastructure needed to manage which variables are exposed and how they’re accessed remotely.
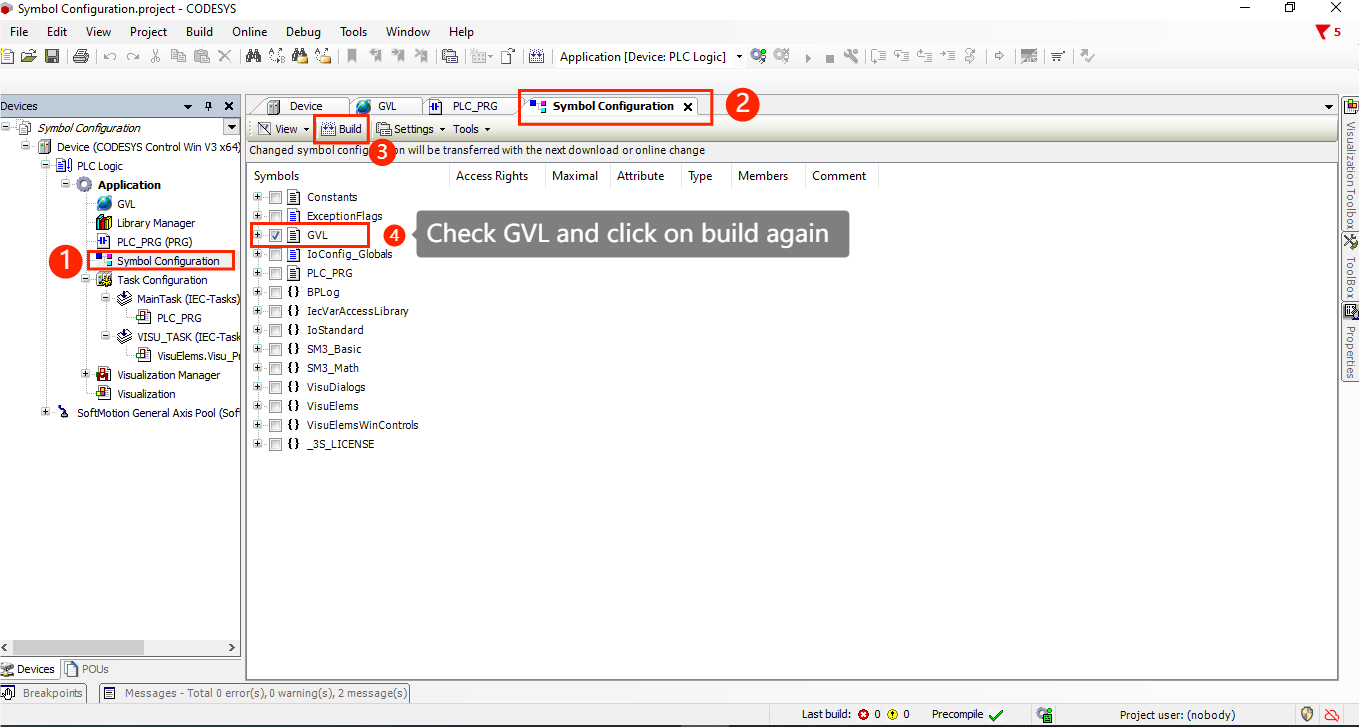
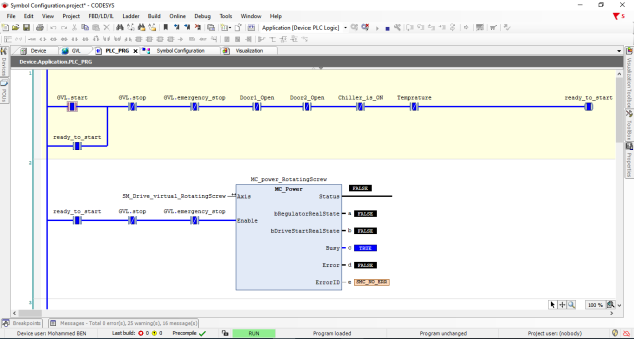
Step 7: Configure Symbol Access Rights and Build
Now open the Symbol Configuration window to set permissions and build the symbol set.
Steps:
- Double-click the Symbol Configuration object you just created
- The Symbol Configuration window opens
- Click the Build button to scan and include your GVL variables
- Check GVL and click on build again
Step 8: Login and Run Your Application
With symbol configuration complete, deploy your application to the virtual PLC.
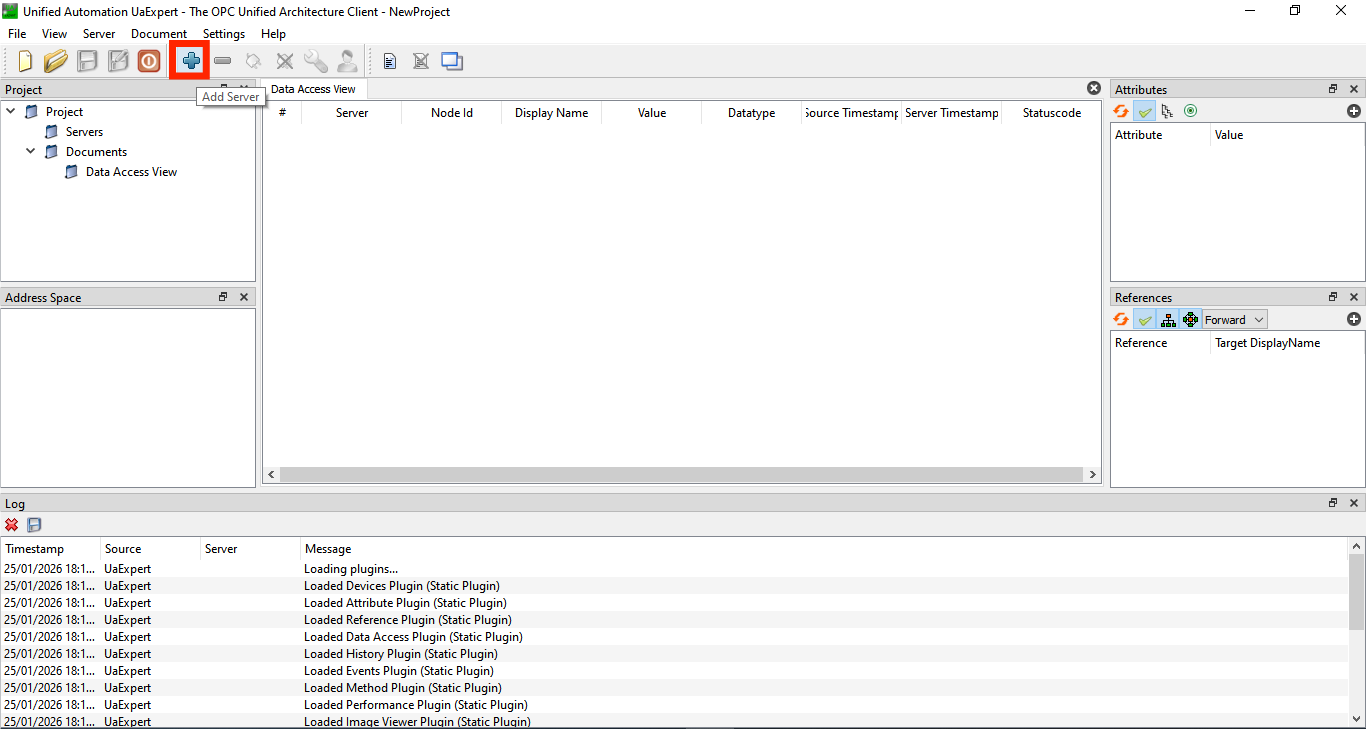
Step 9: Launch UaExpert OPC-UA Client
UaExpert is a powerful OPC-UA client that allows you to connect to your CODESYS virtual PLC and monitor symbols in real-time.
Steps:
- Open UaExpert application
- You’re greeted with the main interface showing an empty server list on the left
UaExpert provides a graphical interface to browse, read, write, and monitor OPC-UA nodes from any OPC-UA server.
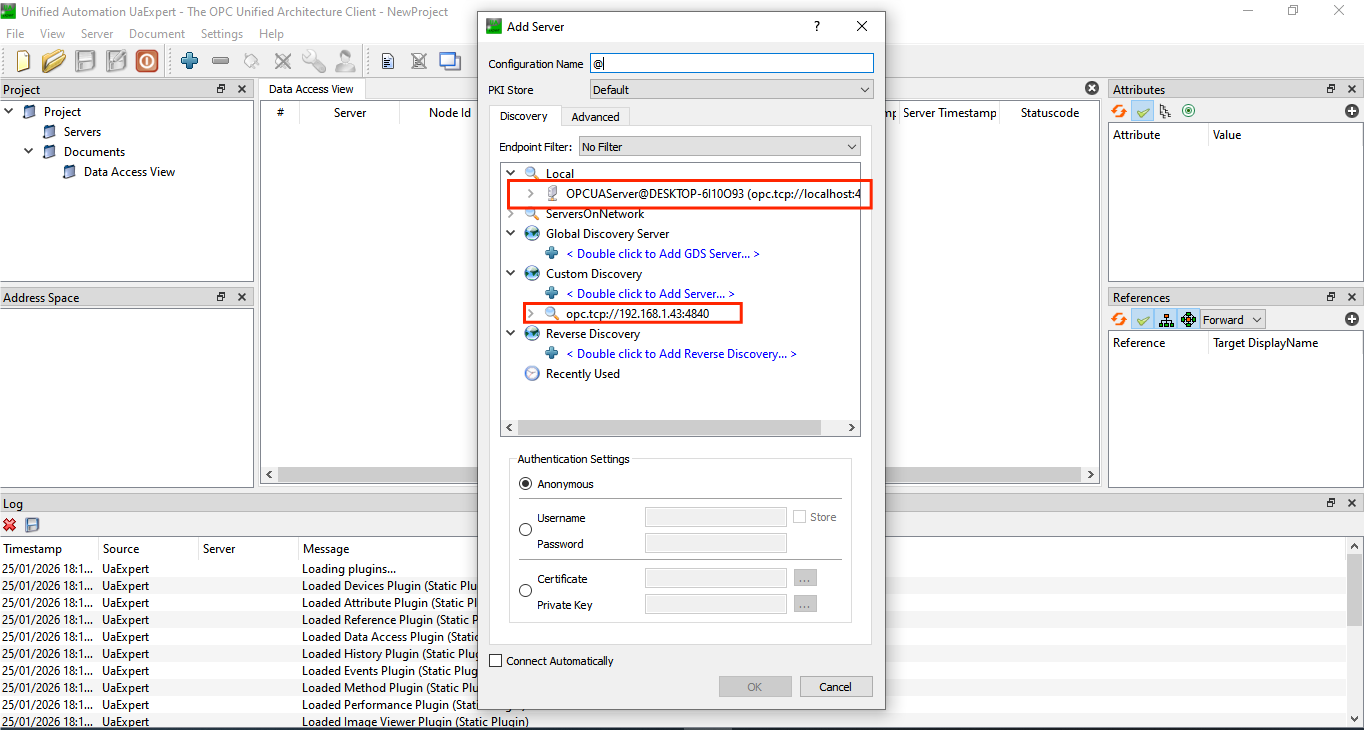
Step 10: Add New OPC-UA Server Connection
Connect UaExpert to your CODESYS virtual PLC.
Steps:
- In the Servers section on the left, click the plus icon (+) to add a new server
Server Details:
- Address: Leave as localhost or your machine IP
- Port: Default OPC-UA port is typically 4840 (CODESYS standard)

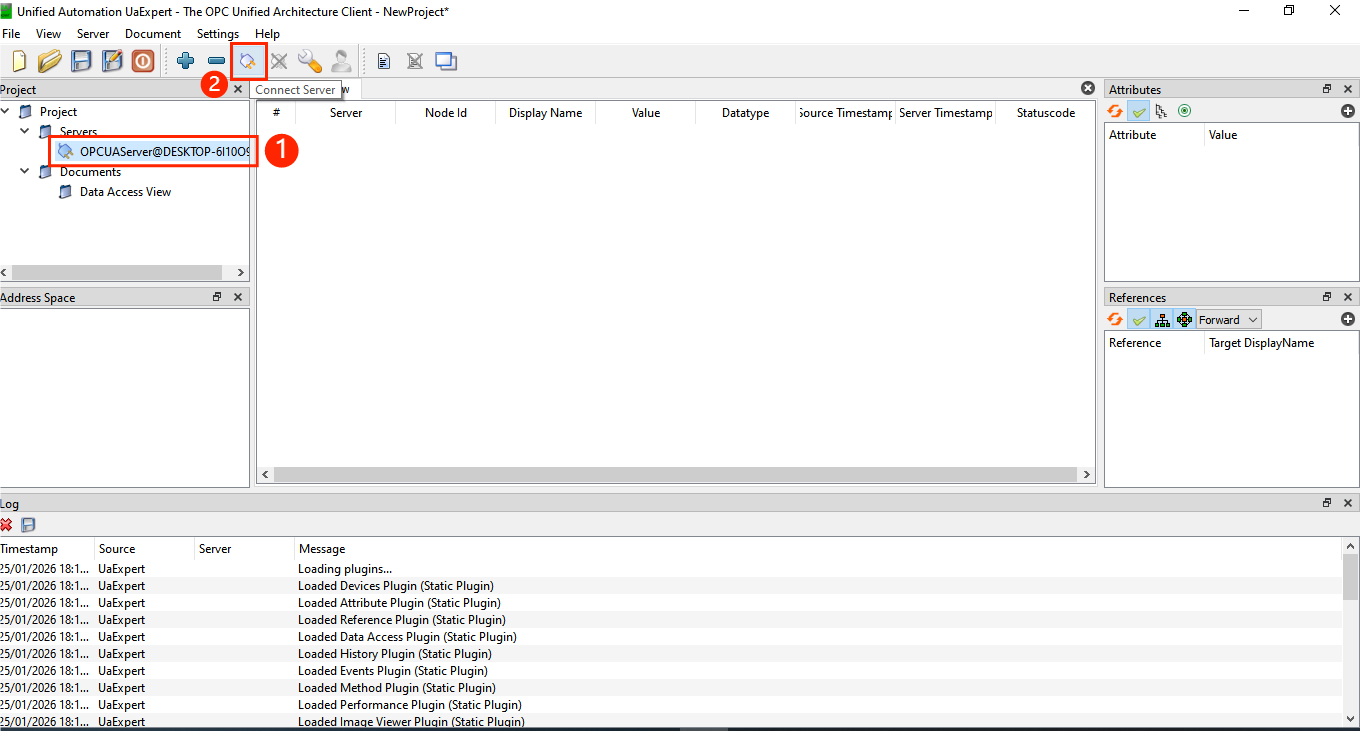
Step 11: Connect to Server and Browse Symbols
Now establish the connection to your CODESYS PLC symbols.
Steps:
- In the Servers list, right-click your newly added CODESYS server
- Click Connect Server (or click the Plug icon)
- UaExpert attempts to connect to the OPC-UA endpoint
Browse Variables:
- Expand the server tree on the left
- Navigate to Objects folder
- Expand it to reveal your symbol set
- Inside, you’ll find all variables from your GVL:
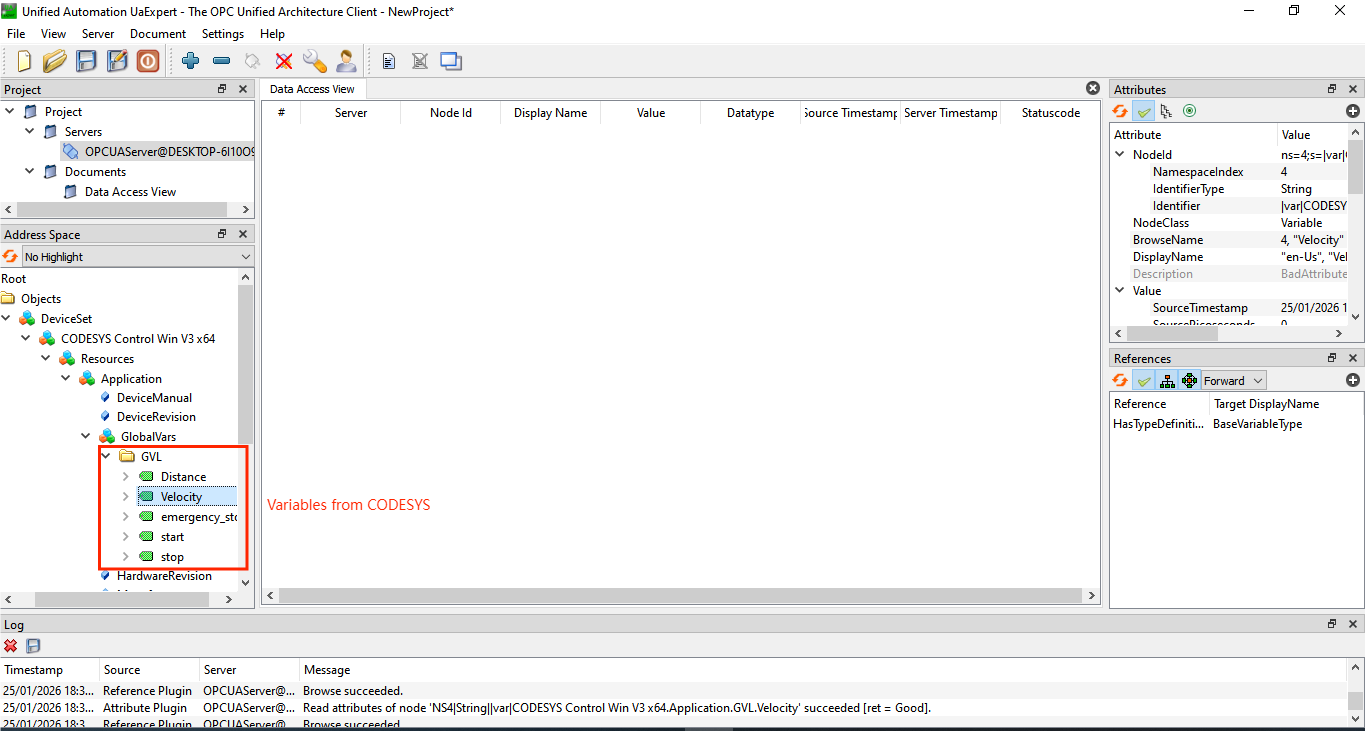
Each variable is now accessible as an OPC-UA node.
Step 12: Monitor Real-Time Data Exchange
With the connection established, you can now observe data flowing between CODESYS and UaExpert.
Real-Time Monitoring:
- In UaExpert, select any variable (e.g., Velocity)
- The Value column shows the current value from your CODESYS PLC
- As your PLC application updates these variables, the values refresh automatically in UaExpert
- Watch values change in real-time as your application runs
Writing Values:
- Double-click on value
- Write a new value and click Enter
- The value updates in your CODESYS PLC and affects your running application
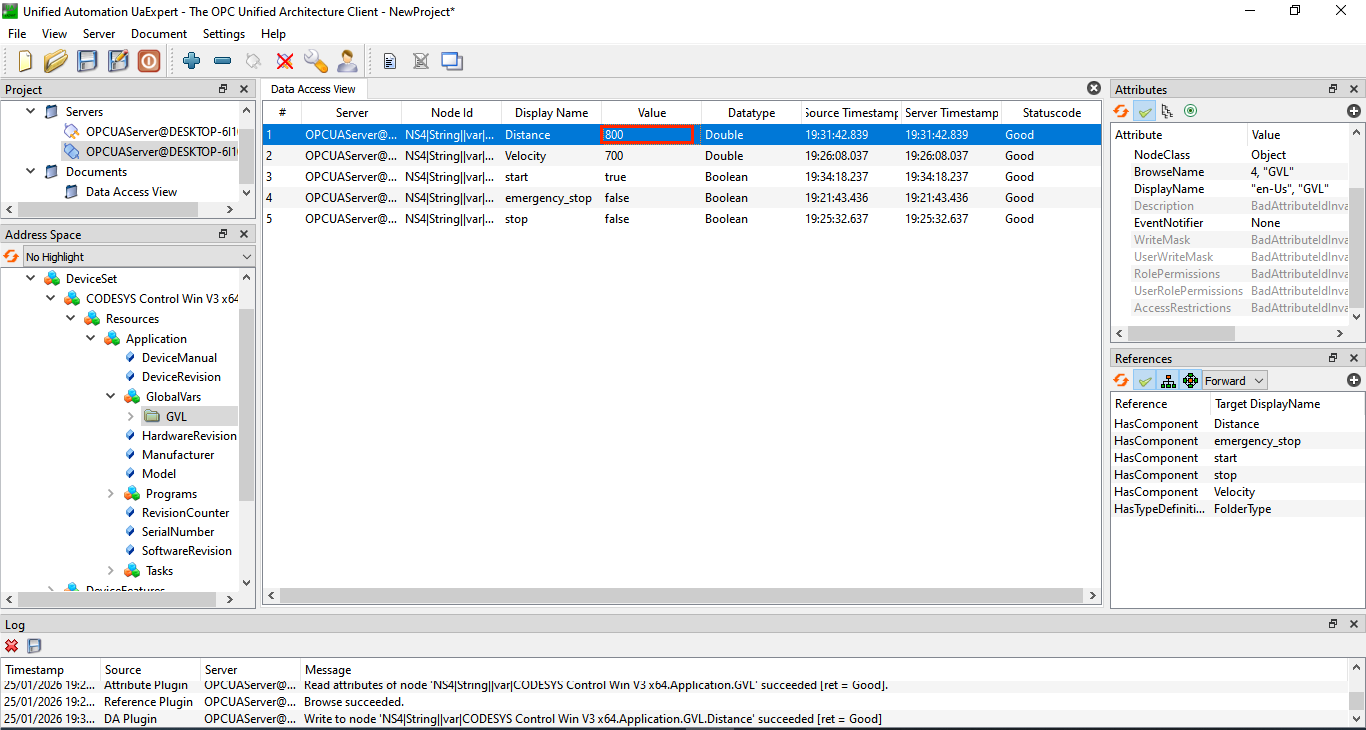
This bidirectional communication confirms that your symbol configuration is working correctly and that external applications can both read and write your PLC variables.
Issue: UaExpert Cannot Connect to CODESYS PLC
Solutions:
- Verify CODESYS Control Win v3 is running in system tray
- Check that the PLC was started successfully
- Confirm the virtual PLC is online in CODESYS IDE
- Verify port 4840 is not blocked by Windows Firewall
- Check that OPC-UA support is enabled in Symbol Configuration
Issue: Symbols Don’t Appear in UaExpert Browse Tree
Solutions:
- Ensure Symbol Configuration was built (click Build button)
- Verify “Support OPC UA features” was checked when creating symbol set
- Confirm your GVL variables are declared globally, not locally
- Log out and log back into the PLC to refresh symbol exposure
- Rebuild and re-download the project to the virtual PLC
Issue: Values Update in CODESYS But Not in UaExpert
Solutions:
- Check network connectivity between CODESYS IDE and UaExpert
- Verify symbol access rights include Read permission for your user group
- Monitor the symbol directly in CODESYS to confirm values are actually changing
- Disconnect and reconnect UaExpert to refresh data
Summary
You’ve successfully configured Symbol Configuration in CODESYS and communication between CODESYS Control Win v3 and UaExpert. This setup provides a complete development and testing environment for OPC-UA applications without requiring physical hardware.
The workflow you’ve learned—creating GVL variables, configuring symbol sets with OPC-UA support, managing access rights, and monitoring real-time data exchange—forms the foundation for professional CODESYS development. These same principles apply when deploying to physical PLCs and industrial controllers.
By mastering symbol configuration in a virtual environment, you gain confidence and experience before working with real hardware and production systems. The ability to rapidly prototype and test communication architectures is invaluable in modern industrial automation development.
More you will find in our PLC programming course in Codesys: